Fan Art Tutorials
Welcome to the Tutorials thread! Here you can post specific tutorials relating to various graphic tools and styles, for all different kinds of programs. This thread is designed to go hand in hand with the "Got a Question? Ask Here!" thread, however there are some basic differences/guidelines.
Frequently Requested Tutorials:
How to make an animated avatar in Photoshop
How to upload and thumbnail images
Enjoy!
- This thread is for tutorials only. Please do not post asking questions on this thread. Your comments will be removed off of the forum and questions will be moved to the Got A Question thread. Make life easy for the mods, just don't post comments/questions here.
- Please put a title at the top of your tutorials stating what they are. To make it easy to find, put this in bold.
- If someone asks a question in the Question thread, feel free to link to various tutorials in this thread.
- Have fun! That's what fan art is all about, and we hope this thread helps everyone to become better artists.
Frequently Requested Tutorials:
How to make an animated avatar in Photoshop
How to upload and thumbnail images
Enjoy!
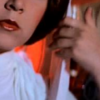
 this:
this:  this:
this:  and this:
  to this:

 To this:

 and set it to lighten at 35% opacity. Add this texture
  rotate it to the left once and set to lighten at 15% opacity. Add this texture
  and set it to 25% opacity. Add this last texture
  rotate it to the right twice and set to 15% opacity.
 to this:


 < Rotate it 90 degrees to the right. Set it to Multiply 100. Erase the top part of the texture with a Circle Fuzzy (15) brush till you get to the part of the texture going down.


 to this:

 to this:


 to this:

 to this:


 to this:

 in GIMP. (I don't have the base saved, sorry!)
 (by ?). I rotated it 90 degrees counter-clockwise and set it to Screen 100%
 (by ?). I set it to Screen 60%
 (by ?), set it to Screen 100%, and moved it where I wanted it.
 to this
  , recreating this
  .
. (by ?) and set it to Multiply 100%
 (by
(by  (by me) and set it to Addition 50%. Move it so it’s over his head. It just makes it look a little foggier.
 (by
(by  to this:

 to this:


 to this:
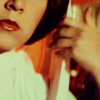
 to this:


